
A correct asphalt paver installation is a chain of five controlled steps — subgrade verification, paver positioning, screed pre-heat, mix-feed calibration, and joint/compaction handover — and failure at any one step surfaces as mat raveling, segregation or low density.
For any asphalt paver laydown on commercial paving, heavy-civil roadway, or municipal patching, the installer's job is to keep mat temperature above ~120 °C at the screed, hold a uniform auger chamber head, and match forward speed to delivery tonnage, with Baldwin Paving Co. (established 1979, 9 asphalt plants, 450+ employees) operating as one reference for a fully integrated supply-and-place workflow in the U.S. Southeast [S1].
Pre-Install: Subgrade, Tack Coat and Paver Positioning
Subgrade tolerance for HMA base lift is typically ±10 mm over a 3 m straightedge; soft spots must be stabilized or removed before the paver tracks onto the grade, otherwise the floating screed will mirror the rut and the mat will compact unevenly [S1].
Tack coat (typically SS-1, SS-1h, CSS-1 or CRS-1 emulsified asphalt) is sprayed at 0.20-0.35 L/m² residual on the cleaned surface; a uniform break must be reached — tack that weeps under paver tracks lifts into the mat and creates blisters [S1].
Position the paver using a reference line: a 6 lb (≈2.7 kg) nylon line on stakes for hand-laid curb sections, or a 3D stringless system (total station or GNSS) for highway work, with the tow point set so the screed's leveling arm stays near mid-stroke for full hydraulic correction range. Chain the paver to the delivery truck for the first 5-10 m to avoid bump-start shoving the screed plate.
Screed Pre-Heat, Extension Setup and Pre-Check
Pre-heat the screed plate with the burners for 20-30 minutes until plate temperature reads 120-160 °C (verified by IR pyrometer at multiple points across main, extension and tamper zone); a cold screed pulls heat out of the first 1-2 m of mat and tears the surface [S4].
Set the screed extension (front and rear) to match design paving width; verify with a tape on both sides, then check the crown profile with the handheld string line. For hydraulically extending screeds, lock extensions after width confirmation so vibration does not walk them out during paving.
Confirm auger height: with the screed floating at null, the auger shaft should sit roughly 5-10 cm above the bottom of the auger chamber extension, low enough to feed the center of the mat but high enough to avoid grinding the subgrade or RAP chunks.
Mix Feed, Paver Speed and Auger Calibration
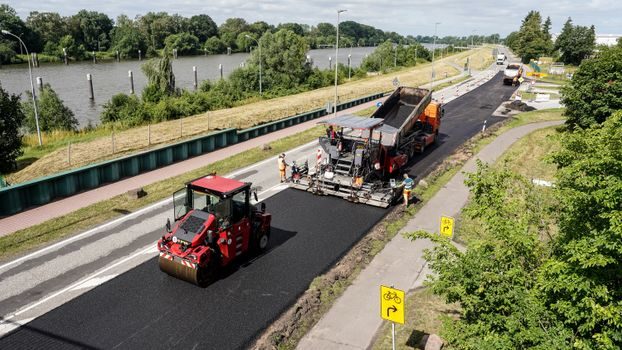
Paver forward speed should be governed by delivery tonnage, not by the stopwatch — for a typical 3.0-4.5 m screed and 50 mm compacted lift, 4-6 m/min (≈0.07-0.10 m/s) is the working band, and the rule of thumb is to keep 3-5 truck exchanges in front of the paver at all times [S1].
Auger speed must hold material head roughly 1/3 of auger shaft diameter above the auger gearbox, in front of the auger tunnel at the center, and within ±2 cm of the same height at each outboard sensor; a starving auger leaves a dry streak in the center, an over-fed auger pushes the mix onto the mat and cools the edges [S4].
Material flow gates (left/right) are set so the auger runs 70-90% of the time, not continuously — a 100% on-time auger signals over-gate; periodic stop-start pulses indicate the gates are choked and starving the extensions [S3].
Lift Thickness, Mat Temperature and Compaction Window
For dense-graded hot mix on a stable base, lift thickness after rolling is typically 3-5× nominal maximum aggregate size — e.g. 50-75 mm for 12.5 mm NMAS, 75-100 mm for 19 mm NMAS — and the uncompacted mat behind the screed is laid roughly 20-25% thicker than the final design to allow for roll-down [S1].
Mat temperature behind the screed must be read with a calibrated IR surface thermometer: target ≥135 °C for conventional HMA at breakdown rolling, and ≥120 °C as the absolute cessation temperature for the breakdown roller; cold-mix patching or WMA shifts these windows down [S4].
Compaction sequence is breakdown (steel or vibratory) immediately behind the paver, then intermediate (pneumatic) for tightness, then finish (static steel) for surface texture; longitudinal joints get a 100-150 mm overlap and a 25-50 mm "pinch" roll on the hot side to seal the seam.
Common Failure Modes, Joints and When to Stop the Paver
Segregation (coarse-stone streaking) at the auger box edge is most often an auger-height or flow-gate problem, not a mix-design problem — drop the auger 1-2 cm and re-check the gate before blaming the plant [S3].
Transverse cold joints form at every paver stop: cut back the previous mat to a vertical face on a chalk line, apply tack to the vertical face, and overlap the new mat 25-50 mm onto the cold mat so the auger extension fills the wedge before the pinch roll [S1].
Stop the paver if delivery trucks fall more than 30 minutes behind, if mat temperature at the screed drops below 115 °C, or if rain wets the placed uncompacted mat — pushing cold or wet mix produces a low-density, raveling surface that cannot be reworked by additional rolling.
Wear Parts, Service Access and Routine Pre-Install Inspection
The wear parts that most directly affect installation quality are auger flighting, floor plates (auger tunnel liners), conveyor chains, screed wear plates, and tampers/wear plates behind the main screed — all are stockable consumables for brands such as Caterpillar, Komatsu, Volvo, Sany, XCMG, JCB and Shantui, and the rule is to pre-stage them on site before the first truck arrives [S3].
Pre-install walk-around: check hydraulic oil level and filter condition, conveyor chain tension (15-25 mm mid-span sag on most tracked pavers), auger bearing play, tamper bar bolts at 100% torque, and burner ignition — a failed burner mid-shift will not allow screed pre-heat and effectively halts the install [S3].
Hydraulic and engine filters (air, fuel, hydraulic return) are a 250-500 hour replacement item on most modern tracked pavers; keeping a fresh filter set on the service truck avoids the most common mid-shift stoppage, which is an unplanned contamination shutdown.
For a deeper look at how paver class and screed width drive this workflow, see the Asphalt Paver Types and Classifications spec reference; for the milling machine that often feeds the same paving train, the Cold Milling Machine installation guide covers crawler ground-pressure and conveyor set-up.
Trackable next signal: GDOT-style owner specifications on recycled asphalt pavement (RAP) content and 64-22/76-22 liquid asphalt supply at the asphalt plant, with on-site mat-temperature logging and 250-hour paver filter service as the routine checkpoints between projects [S1].
Spec-level background on the components involved: linear guide, and crossed roller guide.